5 Ways to Get Better Results with Veo 3
Simple tricks that will make your AI videos look professional

People often get frustrated with Veo 3 because their videos come out with these problems:
Choppy, unnatural movements
Characters that look different from scene to scene
Weird, robotic voices that don't match the action
Scrambled or misplaced subtitles
Scenes that don't connect properly
Objects that appear and disappear randomly
Lighting that changes for no reason
When people see these results, they ask: "Why do I get poor quality? Is it my prompt?"
We already have a detailed guide for writing prompts. But improving prompts are not enough.
The real issue is not the prompt, it’s the workflow. Professional creators know that great videos come from the right workflow.
In this tutorial, we'll use mitte.ai because it gives us precise control over every step of the process and workflow in a clean and simple interface.
Here are 7 proven techniques that will dramatically improve your Veo 3 results.
1. Use Negative Prompts
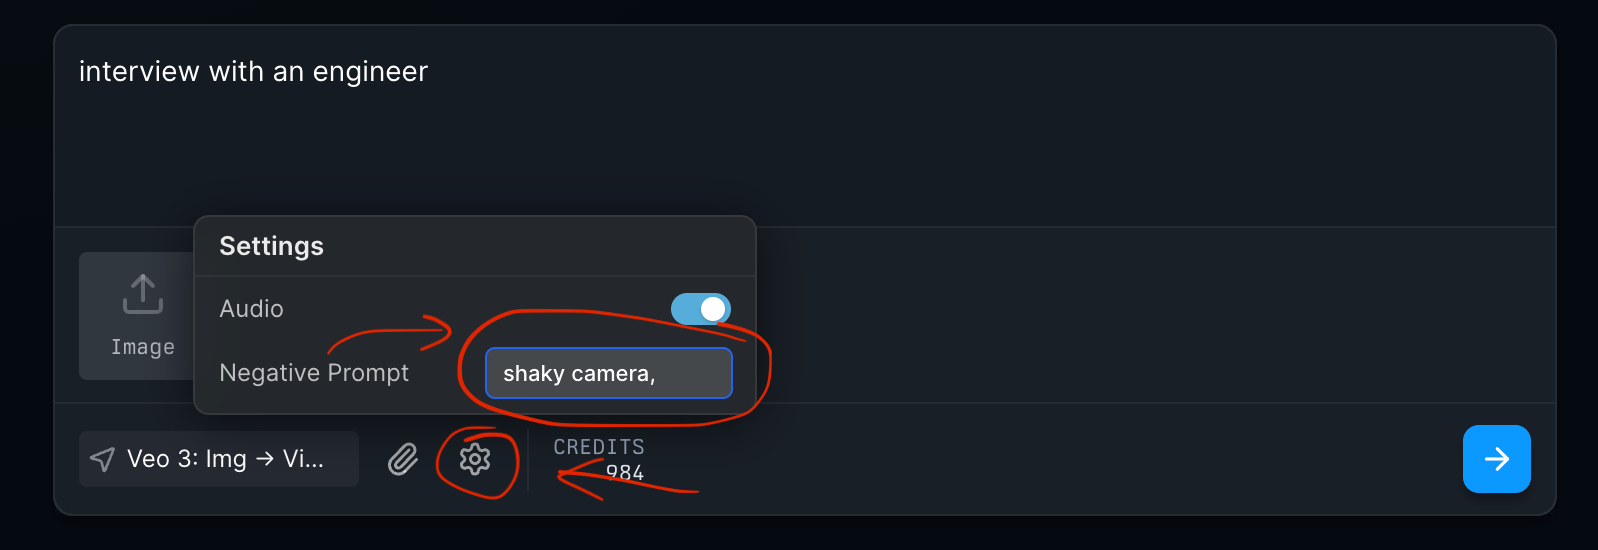
Negative prompts tell Veo 3 what NOT to include.
To add them, click the “Settings” icon after selecting “Veo 3” model on mitte.ai’s menu:
Examples:
✅ "blur, shaky camera, distorted hands"
✅ "rain, crowded areas, sunglasses"
Common things to avoid:
Blurry footage
Shaky camera movements
Distorted body parts
Unwanted objects in scene
Poor lighting
Choppy animations
Why This Works:
Prevents common AI mistakes
Gives you cleaner results
Saves time on re-generations
More predictable outcomes
Advanced Tip: Keep a list of negative prompts that work well for your type of content.
2. Don't Squeeze Too Much Into Single Clips
The Problem: Trying to fit a whole story into one video clip.
Many people write prompts like this: ❌ "
A person wakes up, gets dressed, eats breakfast, leaves house, drives to work, and arrives at office"
This creates chaos. Veo 3 gets confused with too many actions. Your video will look jumbled and unrealistic.
The Solution: Focus on one main action per clip.
Instead, create separate clips:
✅ "Person slowly waking up in bed, stretching arms, morning sunlight"
✅ "Person putting on business clothes, adjusting tie in mirror"
✅ "Person eating toast at kitchen table, checking phone"
Why This Works:
Veo 3 can focus on making one action perfect
Each clip looks more realistic
You have better control over timing
Fewer things can go wrong
Think like a movie director.
Before you start generating, plan your whole video:
Step 1: Write your complete story Example: "A chef makes a perfect pizza"
Step 2: Break it into scenes
Scene 1: Chef preparing ingredients (8 seconds)
Scene 2: Rolling out dough (8 seconds)
Scene 3: Adding toppings (8 seconds)
Scene 4: Pizza going into oven (8 seconds)
Scene 5: Taking finished pizza out (8 seconds)
Step 3: Generate each scene separately This gives you 40 seconds of high-quality footage instead of one messy long clip.
Pro Tip: Keep each clip between 5-10 seconds. This is Veo 3's sweet spot for quality.
Benefits:
Each clip looks professional
You can fix problems in individual scenes
Final video flows smoothly
Much better overall quality
[place image of video planning flowchart here]
3. Choose the Right Camera Quality
This trick makes your videos look authentic and professional.
Different scenes need different camera qualities. Matching the right camera to your content makes everything look more believable.
For Cinematic Scenes
Use high-end camera names for dramatic, professional-looking content.
Examples:
✅ "Epic battle scene, shot with Red Epic Dragon 6K, cinematic lighting"
✅ "Romantic sunset dinner, shot with Arri Alexa Mini, soft golden hour lighting"
✅ "Dramatic car chase, shot with Sony FX9, dynamic camera movements"
High-Quality Camera Options:
Red Epic Dragon 6K
Arri Alexa Mini
Sony FX9
Canon C300 Mark III
Blackmagic Ursa Mini Pro
When to Use:
Movie scenes
Dramatic moments
High-budget commercial looks
Fantasy or sci-fi content
Professional product showcases
For Natural, Everyday Scenes
Use consumer cameras for realistic, casual content.
Examples:
✅ "Street interview with random people, shot with iPhone 7, handheld"
✅ "Cooking tutorial in home kitchen, shot with iPhone 12, natural lighting"
✅ "Travel vlog walking through market, shot with GoPro Hero 9"
Natural Camera Options:
iPhone 7, iPhone 12, iPhone 15
Samsung Galaxy S21
GoPro Hero 9, Hero 11
Canon EOS Rebel
Basic DSLR camera
When to Use:
YouTube content
Social media videos
Vlogs and tutorials
Documentary style
Behind-the-scenes footage
Street interviews
Home videos
Why Camera Choice Matters
Believability: People expect different quality levels for different content types.
Audience expectations: A movie scene should look cinematic. A TikTok video should look casual.
Technical realism: High-end cameras have different characteristics than phone cameras.
Examples in Action:
Cinematic Wedding: "Bride walking down aisle in slow motion, shot with Arri Alexa Mini, golden hour lighting, shallow depth of field"
Casual Wedding Vlog: "Bride getting ready with friends, shot with iPhone 12, natural lighting, candid moments"
Both are wedding videos, but they serve different purposes and audiences.
[place image showing cinematic vs natural camera quality examples here]
4. Use First Frame (Image to video)
The best way to prompt Veo 3 is to provide an initial frame.
You can create the initial scene with a photo you take, or you can generate it and edit it using mitte.ai's editor.
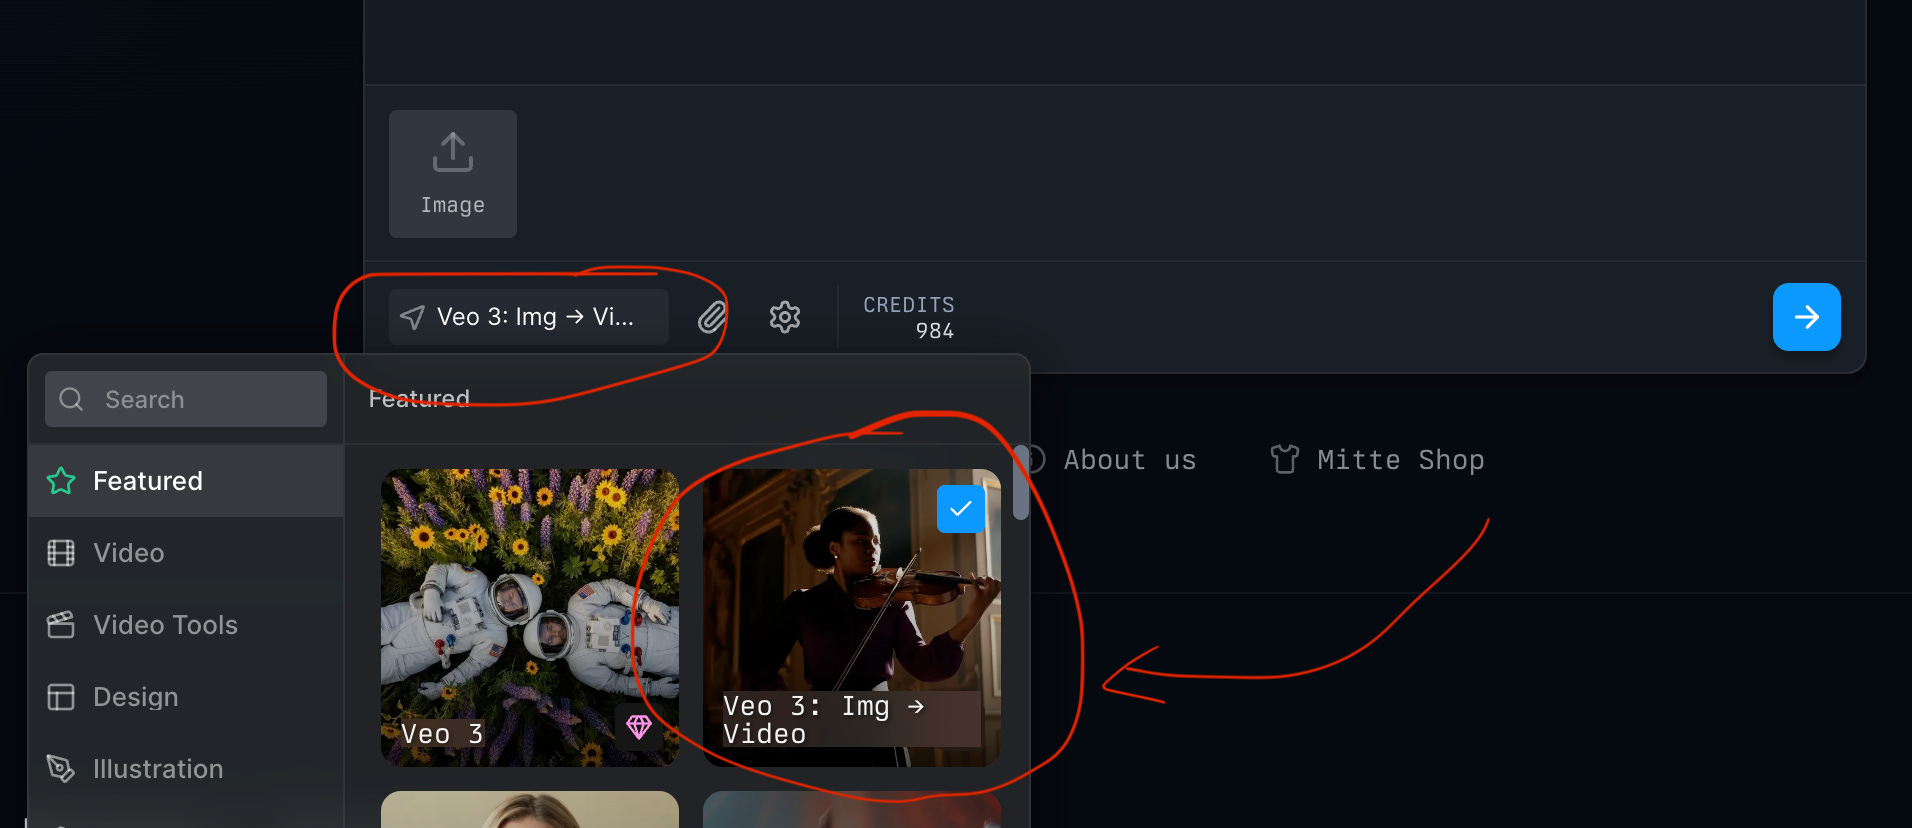
To use first frame, open mitte.ai, choose “Veo 3: Img → Video” model.
Why First Frame Works:
Veo 3 focuses on animating instead of creating the scene
You control exactly how everything looks at the start
Much more predictable results
Professional-looking compositions
Two Ways to Create First Frame:
Option A: Take a real photo
Use your phone or camera
Set up the scene you want
Upload it to start your video
Option B: Generate initial frame with AI
Ope mitte.ai
Choose an image model that fits your use case
By default, it’ll be “Flux Kontext". Try others, such as Flux Pro.
Don’t forget editing
Open mitte.ai/editor
Upload your starting frame
Edit it until it looks perfect
Upscale
A good first frame is 80% of a successful video.
5. Choose the Right Tool
Not all AI platforms are the same.
Why we recommend mitte.ai:
1. Access to Multiple Image Models With mitte, you can access many image models, which helps you create the perfect first frame. This is incredibly important for your end result.
2. Advanced Editor for Precise Control You can create and edit using mitte's advanced editor made for precise editing. This allows you to place products, clean up artifacts, and upscale images. This is very powerful.
3. Complete Workflow in One Place
Generate images
Edit them precisely
Turn them into videos
All without switching platforms
4. Better Results The combination of multiple models and precise editing tools gives you professional results that look incredibly realistic.
Watch this video example of using mitte to create a video so realistic it can't be distinguished from real footage:
Common Mistakes to Avoid
Mistake 1: Trying to do everything in one clip Fix: Break it into smaller scenes
Mistake 2: Ignoring the starting image Fix: Always use image-to-video when possible
Mistake 3: Not planning ahead Fix: Write out your complete story first
Mistake 4: Rushing the editing Fix: Take time to make smooth transitions
Mistake 5: Forgetting negative prompts Fix: Always specify what you don't want
Final Tips
Start small: Don't try to make a movie at once. Master short clips first.
Be patient: Good results take time. Don't rush the process.
Save what works: Keep notes on prompts that give you great results.
Experiment: Try different approaches and see what works for your style.
Have fun: The best videos come from creators who enjoy the process.
Ready to Create Better Videos?
These techniques will transform your Veo 3 results.
Now go create something amazing using our recommended tool!